How to increase monitor brightness on a laptop. Lost brightness adjustment? How to reduce brightness on a Windows 7 laptop
The computer display is one of the most basic devices that provides feedback when the user contacts an electronic computer, and one of the main organs on the human body responsible for this communication in a significant number of cases are the eyes, which bear most of the load when working on a PC.
Obviously, it is necessary to reduce the load on this sense organ as much as possible in order to maintain full health and performance for as long as possible. You can minimize the degree of eye fatigue by making special adjustments to the settings in Windows 7, and in particular, ensuring comfortable screen brightness on Windows 7. However, owners of computers on the mentioned OS often have difficulty adjusting this parameter.
Below are detailed guides with step-by-step descriptions of how you can set the optimal screen brightness on a computer running the Windows 7 operating system, using which even novice users can quickly configure and adjust the brightness based on their own preferences.
Setup procedure using built-in Windows 7 tools
To make adjustments using the default “Seven” means, you must perform the following sequential steps:
 The process of adjusting the monitor backlight using software from a computer graphics accelerator
A convenient method for setting a favorable level of monitor brightness is the PC video accelerator driver. Below is an example of an adjustment technique using Nvidia software. The algorithm of sequential actions consists of the following steps:

Using a laptop keyboard
To quickly change the brightness level, you can use special keys, for example, on a Lenovo laptop on Windows 7, the “Fn” buttons and the “Down” and “Up” arrows are used for this purpose.
 Of course, for each individual laptop model, these button combinations may be individual, so it is recommended that you first check the instructions that came with the computer, which can also be downloaded from the equipment manufacturer’s website.
For our example, you need to do the following:
- If you want to reduce the power level of the display backlight, you should hold down “Fn” and click on the button with the arrow pointing “Down” several times;
- Using a similar technique, when you click on “Up”, the brightness will increase.
Using the capabilities of a desktop computer monitor
Most monitor manufacturers provide the ability to quickly adjust display backlight levels. For example, on “LG Flatron W1943SS” you need to perform the following steps:

Why do brightness settings fail?
This often happens due to incorrectly updated drivers or due to the lack of a video card software update.
To update the drivers you need to complete the following steps:

Sometimes difficulties are caused by a driver that does not match the system, and it is recommended to restore an earlier version of the software. In the “Device Manager” window, enter the driver properties and roll it back, as shown in the figure below. 
Setting the optimal backlight level through programs
Today, a large number of applications have been developed specifically designed to adjust this screen parameter. The most popular utilities include the following:
The utility at the top of the list is capable of working with several profiles and provides quick and convenient switching between them.
 Application number two allows you to adjust the display backlight via the tray icon. Additionally, the utility is equipped with functions to turn off the monitor and turn on the screen saver.
 And the last program in the above list, but by no means the least in terms of the capabilities provided to the user, provides quick access to adjusting the levels of contrast, backlight and gamma, which makes working at the monitor optimal and significantly reduces eye strain.
Conclusion
Controlling the brightness level of the display is not particularly difficult with detailed instructions, even for beginners. It is recommended to use the tools built into the system to configure this parameter so as not to increase the load on the computer with additional utilities.
Tired of staring at a dark laptop screen? Increase the brightness! The procedure for carrying out this simple event may differ for different laptop models, but in general the process remains the same. To change the brightness, you can use hotkey combinations or use the capabilities of the operating system itself. Choose the method that you like best.
Using shortcut keys to increase brightness
The quickest way to increase brightness is by using special keyboard shortcuts. For different laptop models, such combinations may vary. In most cases, the brightness is changed by simultaneously pressing the Fn button and one of the F keys (F1-F10). Also, the brightness can be adjusted using a combination of Fn and arrow keys.The combination can only be determined experimentally. As a rule, the corresponding buttons have a special marking in the form of a “sun”. Hold Fn and click on the brightness increase button until you achieve the desired result. If it was not possible to configure the screen parameters in this way, we use the software method.
We work through the Control Panel
The procedure is as follows:First step. Open Start.
Second step. Go to the Control Panel.
Third step. Find the Screen section and open Brightness Settings.
We see the power settings menu. We look down and find the brightness level adjustment slider. Drag the slider in the desired direction.
You can also get to this menu in another way. To do this, find a battery icon in the lower corner next to the clock. We right-click on it with the right mouse button, open “Power Options” and perform the already familiar actions.
What if the brightness does not change?
If you are unable to change the brightness using hotkeys, the problem may lie in the simple lack of drivers for the Fn function button. Download the required driver from your laptop manufacturer's website and install it. If the button works (for example, it allows you to adjust the sound level), check that the video card drivers are working properly.The worst case scenario is a hardware problem. For example, a backlight lamp or some kind of cable may break. To troubleshoot such problems, you will have to contact repairs. Now you can adjust the brightness level. Follow the instructions and everything will definitely work out.
Today it is impossible to imagine life without computers. However, it is important to remember the rules for using a PC so as not to ruin your health.
The main organ that is most affected is the human eye. In order for the load on it to be minimal, you need to adjust the brightness of the image.
How to reduce brightness on a Windows 7 computer
The most common method is adjustment using the buttons on the display frame. Usually the buttons are "+" and "−" in the lower right corner. The menu button also allows you to specify contrast values.
The keyboard also has special keys. The combination Fn + up/down arrow (in some cases left/right) makes it possible to make the display brighter or dimmer. Or you can use the button with the image of the sun (F2 and F3).
System brightness setting
First, let’s go to “Power Options” in the “System and Security” section. Down there, by moving the slider, you can select the optimal brightness value.

There is also an item “Setting the power supply scheme”, where you can also create an optimal mode.

You can go to additional settings, where you can analyze in detail all the necessary brightness parameters:
- screen brightness from battery and network;
- screen brightness level in low brightness mode;
- adaptive adjustment.

Another way is to dim the brightness through the Mobility Center. To find it, you need to follow the following route: Start → Control Panel → Hardware and Sound. You can do this on Windows 7 using the Win + X key combination.

Solving driver problems
The reason for the violation of brightness settings can be either an outdated or a newly updated driver.
In the first case, you will need to download the latest driver. To do this, perform the following steps:
- right-click on “Start”;
- in the pop-up list we find the toolbar;
- in the window that appears, go to “Video adapters”;
- Right-click on the existing driver and select “Update”;
- You will be prompted to search for drivers on the network or on the PC itself, choose what suits you best.

The second case implies that the downloaded driver does not meet the system requirements of the device. To resolve this issue, you will need to restore the previous version of the driver.
To do this, we will again need the Device Manager. Having selected the desired video adapter, go to its properties, where we roll back the driver.

Adjusting brightness using special utilities
In principle, the methods described above on how to reduce the brightness on a Windows 7 computer are quite sufficient. But maybe someone is interested in programs, and it is easier for them to configure them with special utilities than to tinker with the system. There is a huge variety of software available on the Internet to solve this problem. But the most convenient and effective among them are:
- Display Resolution Manager;
First program allows you to set the color gamma, brightness and contrast values so that your eyes are not overstrained while working at the computer.

Download second utility , you will be able to adjust the brightness in the tray. In addition to the main functions, it also has such functions as turning off the screen (monitor icon in the lower right corner) and launching a screen saver (Screen Saver button).

By using You can create multiple profiles and switch from one to another if necessary. But you should be careful when using this software, it is not intended for old computers and can cause serious damage to them.

So, now you know all sorts of ways to control the brightness level on your PC. Choose the one that seems more comfortable to you and take care of your eyes.
Users of Windows 7/10 operating systems often need to adjust the screen brightness. This is a fairly simple procedure, but some owners of computers, laptops and tablets often have difficulty performing it. In this article we will look at all possible ways to adjust the brightness of the monitor, so that after familiarizing yourself with the material, even novice users can easily carry out this operation.
Adjusting screen brightness using standard Windows 7/10 tools
The simplest and most obvious path to brightness settings within the operating system itself is through the Windows Control Panel. We go into it using the Start menu, and then select the “Power Options” section (in the “Small Icons” or “Large Icons” display mode).
At the bottom we see the “Screen Brightness” slider, by moving which you can increase or decrease the backlight intensity of your monitor.

It is also possible to go directly to the settings of the selected power plan. Here, if you are using a laptop, you can separately adjust the brightness for battery and mains modes.

Owners of modern portable devices running Windows 10 should be aware of one more trick. Many new laptops are equipped with a light sensor that allows adaptive adjustment of screen brightness. That is, the “ten” automatically adjusts the backlight level depending on the amount of light hitting the sensor. It is clear that this function does not always work correctly, often setting an inappropriate brightness level. Therefore, the question quite reasonably arises of how to disable it. You can do this by clicking on the “Change advanced power settings” link in the settings of the current power plan.

In the window that opens, expand the “Screen” tab and switch the “Enable adaptive brightness control” option to the “Off” position. Click the “Apply” button to save the settings.

Adjusting brightness using the video card driver
Another proven way to change the screen brightness is to adjust it using the video card driver. Let's look at this method using Nvidia drivers as an example. Right-click on the desktop and select “Nvidia Control Panel” from the context menu.

In the settings tree on the left, open the “Display” section and select the line “Adjust desktop color settings” from the drop-down list. In the right area, set the switch to the “Use NVIDIA settings” position and move the “Brightness” slider in one direction or another, thereby increasing or decreasing the backlight strength.

Adjusting the display brightness on a laptop
Laptop computers allow you to control many settings using keyboard buttons. Typically, a special “Fn” key is used for these purposes, working in combination with other keys. For example, adjusting the screen brightness on a Samsung RV515 laptop is done by pressing the following button combinations:

On different laptop models, the backlight intensity is adjusted using different key combinations. The combination of Fn and any of the function keys in the F1-F12 range is often used. You can learn more about ways to change the brightness of your laptop's display in its manual.
Setting the brightness on the monitor itself
In most cases, modern monitors have their own buttons on the body for controlling settings for color, contrast, brightness and other parameters. As an example, consider the LG IPS236 monitor. It has several touch buttons on the control panel, press any one and get to the “Monitor Setup” menu.

Select the first item “Menu” and see the scales for adjusting brightness, contrast and clarity. Using the arrows, move to the desired line and set the optimal value.

The issue is resolved in a similar way with other monitor models, only the configuration and location of the button panel differ.
In principle, many screen settings, including brightness, can be adjusted in the monitor itself. And here it will no longer matter what operating system is installed on the computer. Instructions for manually setting parameters are included with the monitor upon purchase; it can also be downloaded from the manufacturer’s website in electronic form.
Conclusion
That's all we wanted to tell you about methods for adjusting screen brightness on a desktop computer and laptop. We hope that after reading this material you will no longer have questions about how to increase or decrease the brightness of any type of display with just a few simple steps.
Adjusting the brightness of the monitor directly affects the work at the computer. Setting the parameters incorrectly may affect your vision. Since all visualization occurs through the monitor, it must be configured correctly.
There are several options for adjusting monitor brightness. The most important thing is to consider the screen refresh rate settings. Fast frame changes minimize the negative impact on vision. You can notice the blinking immediately by taking a few steps back and looking at the screen.
How to reduce screen brightness on Windows 7
Standard Windows tools allow you to quickly change screen brightness settings. For Windows 7, follow these simple steps:
- Control Panel
- system and safety
- Power supply
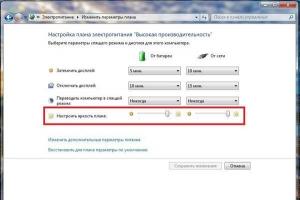
- Change plan options

Here you will see several parameters and at the very bottom sliders for adjusting the brightness of the plan. They are divided into brightness from the battery and from the mains. Select the desired brightness level. If desired, you can set the display to dim, turn off, and go into sleep mode. After that, click “Save changes” and exit.
7 Ways to Change Brightness on Windows 10
Users of this operating system can adjust screen settings in several ways.

Windows Settings
Changing the screen brightness level occurs in several steps:
- Right-click to open the menu on the desktop
- Go to - Screen Settings
- Move the slider forward or backward to adjust brightness

At the bottom of the brightness scale there is a parameter - Night light. Enter settings. Here you can change the time for setting the night light. This function can be left or disabled. When switching to night time, the brightness of the monitor decreases. The light level is set on a scale called Night Color Temperature. Next, set the time parameters. In addition, the geolocation function helps determine the time of sunset and sunrise.

Power plan options
To get started, call up the “Power Options” menu. This can be done by right-clicking on the battery icon in the bottom panel on the desktop or “Control Panel”:
- Control Panel
- All Control Panel Elements
- Power supply
- Changing schema settings
- Adjust brightness
In addition, in the “Advanced Settings” section the choice of actions is wider, which allows you to better adjust the brightness.

Hotkeys
Most laptops, especially the latest generation, have special buttons to adjust the display backlight. They are usually located next to the volume keys. The most common location is the arrows next to “R Shift” or the key range from F1 to F12. The function works using the combination: Fn + Brightness button (“+” or “-”.)

Battery indicator
A very simple and fast way to change the screen brightness. In the taskbar you need to click on the battery icon and open a pop-up window. You will see an adjustment button. Move the slider to the desired level and close the menu.

Action Center
We change the screen backlight parameters in several steps:
- On the taskbar we find the “Action Center” icon
- Using the “Expand” function
- Find the brightness icon and make adjustments by touching LMB.

Mobility Center
You can open the mobility center by right-clicking on the battery icon on the quick launch panel or using the “Win” + “X” key combination. Select the item “Mobility Center”. Use the slider to set the brightness of the monitor.

Display customization programs
There are many programs to adjust screen brightness. For example, you can use one of these services:
- iBrightnessTray
- Display-Tuner
- Display Resolution Manager
Let us especially highlight the Brightness Slider program. It is designed specifically for Windows 10 operating system users. It is very easy to use. After installation, a special icon will appear in the taskbar, similar to the one used to adjust the volume on a computer.

For those who professionally engage in photography or video, we recommend using the Adobe Gamma program to configure the display. It is difficult to learn, but allows you to calibrate the screen image as efficiently as possible.

How to change screen brightness on desktop monitors
Setting up desktop monitors has the slight advantage of mechanical buttons. Monitor menu buttons are usually located at the bottom, side, or back of the monitor. Using these buttons, you can control brightness settings without calling any functions within the Windows operating system.

There are many options in the brightness settings menu. For example:
- Brightness
- Contrast
- Colors
- Gamma
In order to lay a good foundation before adjusting the brightness of your monitor, you need to work on the screen image. Low quality matrices distort the perception of colors. To adjust image quality, use the standard number tool.

If you can clearly see all the numbers, then the screen is configured optimally. Average quality will show the first three numbers. If you see only two or less, it means you need to adjust the picture quality.
Contrast also plays an important role. She is responsible for detailing the light areas. Set the contrast to zero and adjust gradually. For example, if you have a light spot where the folds of your shirt are, then you need to lower the level until the folds become detailed.

In addition, adjust the gamma and grayscale. When adjusting the gamma, dark and light colors disappear when you look at the center of the picture. Shades of gray should not contain red, green or blue.

And finally - brightness. There are a lot of pictures on the Internet that are specially created for adjusting brightness. Colors should not blend into the main background. At the same time, the detailing of objects should be clear. Too high a brightness will result in a predominant light tint.